-
2020.09.16 #TILTIL(today I learned) 2020. 9. 16. 23:18
오늘 학원에서 일러스트레이터로 SWOT 분석 시안을 만들고 GTQ 모의고사를 했다. 포토샵, 일러스트의 툴 사용은 얼추 거의 다 배운 것 같다. 배치 및 디자인에 많은 노력이 필요할 듯 싶다.
오늘은 회원가입 POP-UP form을 만들었다. 아직 html만 구현하고 css는 작성 중이다. 내일 중으로 마무리해야겠다.
또 block요소 center align은 오늘 90프로 완료해서 내일 올릴 것이다.
오늘 배운 것
html
<!DOCTYPE html>
<html lang="en">
<head>
<meta charset="UTF-8">
<meta name="viewport" content="width=device-width, initial-scale=1.0">
<link rel="stylesheet" href="popup form.css">
<title>회원가입 팝업 폼</title>
</head>
<body>
<div class="popup">
<h2>간편 상담 신청</h2>
<div class="content">
<table>
<caption>
<details class="hide">
<summary>간편 상담 신청</summary>
신청자 이름, 연락처, 메모, 적용가능한 혜택 입력 및 체크하는 양식
</details>
</caption>
<colgroup>
<col style="width: 111px;">
<col>
</colgroup>
<tbody>
<tr>
<th>신청자이름<span>*</span></th>
<td><input type="text" id="form1" placeholder="이름을 입력해 주세요."><label for="form1"></label></td>
</tr>
<tr>
<th>연락처<span>*</span></th>
<td><input type="tel" id="form2" placeholder="숫자만 입력해주세요"><label for="form2"></label></td>
</tr>
<tr>
<th>메모(<span class="memo">0/300 byte</span>)</th>
<td><textarea placeholder="궁금하신 점이나 렌탈 계약 진행시 SK매직이 고민해야 할 부분이 있다면 메모로 남겨주세요. 예) 평일 오후 2시~3시 사이에 연락주세요."></textarea></td>
</tr>
<tr>
<th>적용가능한<br>혜택이 있나요?</th>
<td>
<ul>
<li><input type="checkbox" id="bene1"><label for="bene1"></label>T멤버십 회원이예요.</li>
<li><input type="checkbox" id="bene2"><label for="bene2"></label>지금 브로드밴드 인터넷을 쓰고 있어요.</li>
<li><input type="checkbox" id="bene3"><label for="bene3"></label>브로드밴드 인터넷을 신규 가입하여 결합하고 싶어요.</li>
</ul>
</td>
</tr>
</tbody>
</table>
<div class="agree">
<p><span>[필수]</span>개인정보 수집 및 이용 동의</p>
<a href="#a" class="btn_view">전문보기</a>
</div>
</div>
<a href="#a" class="consult">상담신청</a>
<img src="icon_close.PNG" alt="닫기" class="close">
</div>
</body>
</html>
* 일단 <form>을 <table>로 만드는 법을 처음 알았다. 기초 공부할때는 따로 table 태그를 사용하지 않았기 때문에 몰랐던 부분이였음
* th에 텍스트를 td에 <input>를 작성하고 1 table-cell에 여러 input을 작성하기 위해서는 ul-li>input type으로 구성해야함
* <caption> <summary> 같이 화면의 이해를 돕기 위한 요소는 CSS에서 별도로 .hide{position: absolute; left: -3000%} 만들어서 class="hide"를 넣어 화면에서 생략되게 활용할 수 있음 부모요소에 결속되지 않기 때문에 가리고 싶은 요소에 class="hide"를 넣으면 자유롭게 사용할 수 있음
* 위 html은 1차 작성이여서 내일 중으로 수정할 예정임
CSS
.popup{
width: 820px; height: 835px;
position: absolute; left: 50%; top: 50%;
transform: translate(-50%, -50%);
border: 1px solid #ff0000;
padding: 54px 60px 77px;
box-sizing: border-box;
}
.popup h2{
text-align: center;
font-weight: normal;
font-size: 33px;
line-height: 100%;
margin: 0;
}
.hide{
position: absolute; left: -3000%;
}
.content{
margin:42px 0 30px;
border-top: 3px solid #444444;
border-bottom: 2px solid #f4f4f4;
padding: 40px 45px;
}
table{
margin: 0;
}
table th{
font-size: 14px; color: #222222;
text-align: left;
}
table th span{
color: #de4f41;
}
table th span.memo{
color:#999999;
}
table td input, textarea{
width: 100%;
}
* CSS는 아직 한참 미완성..
* inline 요소에 position: absolute; 하면 block화 되어 따로 display를 하지 않아도 width, height 가능함
결과물
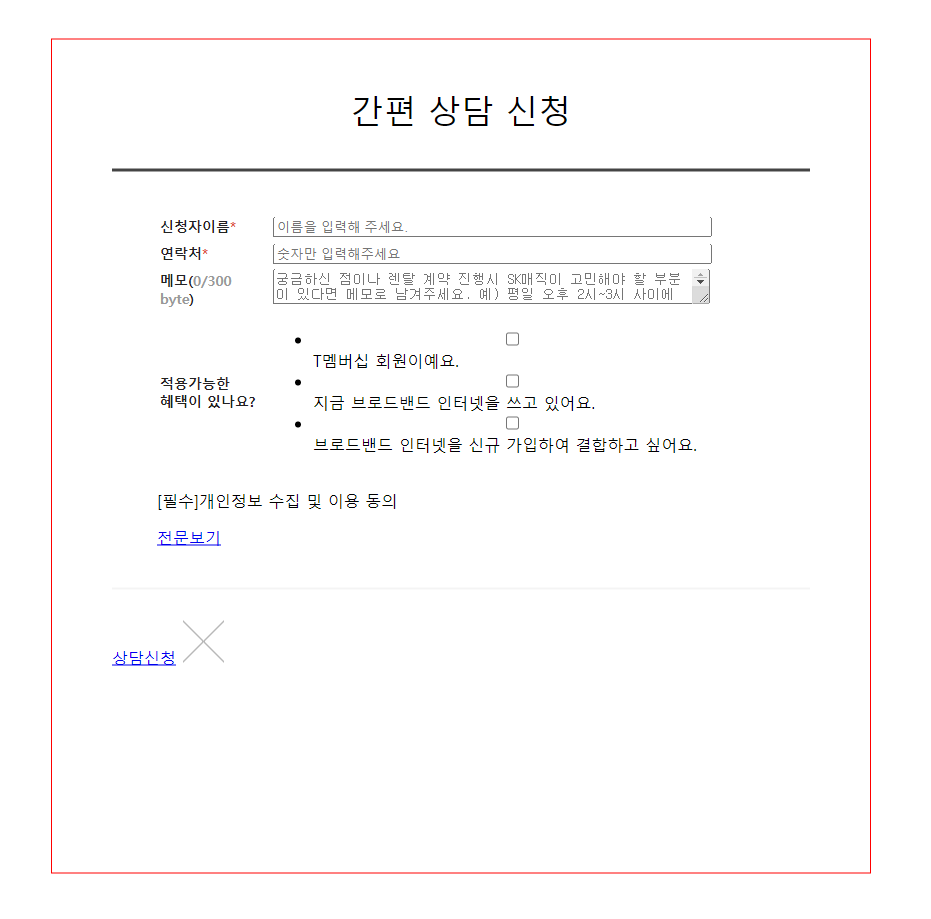
<진행중>
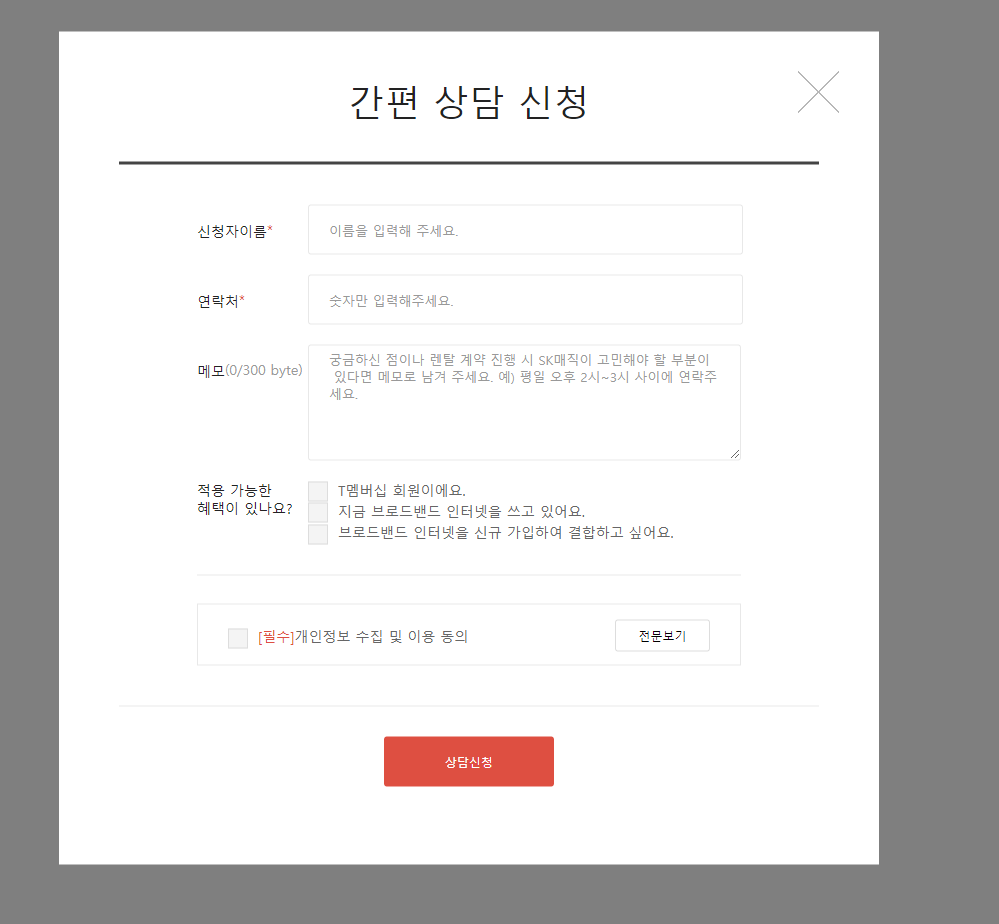
<목표>'TIL(today I learned)' 카테고리의 다른 글
2020.09.22 #TIL (0) 2020.09.22 2020.09.21 #TIL (0) 2020.09.22 2020.09.18 #TIL (0) 2020.09.19 2020.09.17 #TIL (0) 2020.09.18 2020.09.15 #TIL (0) 2020.09.16