2020.09.27 #TIL
오늘은 기초 콘텐츠 따라만들기를 3개 공부했다. 내일부터는 css3를 활용한 콘텐츠만들기를 공부할 것이다.
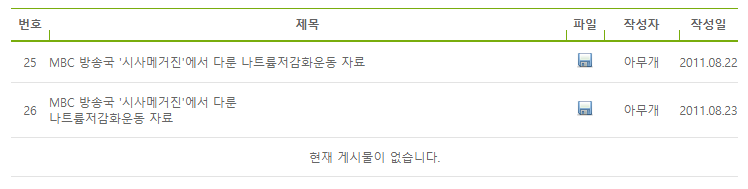
1. 기초 게시판 리스트
HTML
|
<!DOCTYPE html> <html lang="en">
<head> <meta charset="UTF-8"> <link rel="stylesheet" href="community.css"> <meta name="viewport" content="width=device-width, initial-scale=1.0"> <title>Community</title> </head>
<body> <div> <table class="community1" summary="번호, 제목, 파일, 작성자, 작성일 게시판 표"> <caption><span>커뮤니티 게시판</span></caption> <colgroup> <col width="38px"> <col width="*"> <col width="38px"> <col width="75px"> <col width="53px"> </colgroup> <thead> <tr> <th>번호</th> <th>제목</th> <th>파일</th> <th>작성자</th> <th>작성일</th> </tr> </thead> <tbody> <tr> <td>25</td> <td class="subject"><a href="#a">MBC 방송국 '시사메거진'에서 다룬 나트륨저감화운동 자료</a></td> <td><a href="#a"><img src="ico_file.gif" alt="첨부파일"></a></td> <td>아무개</td> <td>2011.08.22</td> </tr> <tr> <td>26</td> <td class="subject"><a href="#a">MBC 방송국 '시사메거진'에서 다룬 <br>나트륨저감화운동 자료</a></td> <td><a href="#a"><img src="ico_file.gif" alt="첨부파일"></a></td> <td>아무개</td> <td>2011.08.23</td> </tr> <tr> <td colspan="5" class="none">현재 게시물이 없습니다.</td> </tr> </tbody> </table> </div> </body>
</html> |
CSS
|
table.community1{ margin: 50px; border-collapse: collapse; } table.community1 caption span{ position: absolute; left: -3000%; } table.community1 thead th{ padding: 0px; height: 33px; border-top: 1px solid #79ad0d; border-bottom: 2px solid #79ad0d; background: url(bg_line.gif) no-repeat left bottom; font-size: 12px; color: #626262; box-sizing: border-box; } table.community1 thead th:first-child{ background: none; } table.community1 tbody td{ padding: 11px 0; border-bottom: 1px solid #e3e3e3; font-size: 12px; color: #666; text-align: center; } table.community1 tbody td.subject{ padding-right: 200px; text-align: left; } table.community1 tbody td.subject a{ text-decoration: none; color: #666; } table.community1 tbody td.none{ color: #888; } |
* 게시판 리스트를 만들때 글이 있을 수도 있지만 없는 경우도 있기 때문에 게시글이 없을 경우에 활용할 것도 만들어놔야 추후 개발자분들이 유동적으로 사용할 수 있음
* 제목은 게시글에 따라 2줄 3줄 길어질 수 있기 때문에 tbody의 여백을 height로 설정해서는 안되며, 위 아래 padding을 넣어서 글 수에 상관없이 일관적으로 여백이 들어가게끔 해야함
* table에 border를 넣으면 원하는 결과가 안나올 수 있는데 이때 border-collapse: collapse;를 사용하면 한 줄로 나옴
결과
 |
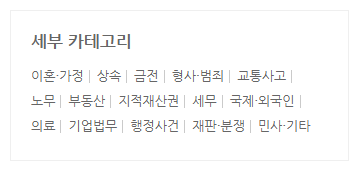
2. 기초 리스트 콘텐츠
HTML
|
<!DOCTYPE html> <html lang="en"> <head> <meta charset="UTF-8"> <link rel="stylesheet" href="category.css"> <link rel="stylesheet" href="default.css"> <meta name="viewport" content="width=device-width, initial-scale=1.0"> <title>category</title> </head> <body> <div class="detail_category"> <ul> <h2>세부 카테고리</h2> <li><a href="#a">이혼·가정</a></li> <li><a href="#a">상속</a></li> <li><a href="#a">금전</a></li> <li><a href="#a">형사·범죄</a></li> <li><a href="#a">교통사고</a></li> <li><a href="#a">노무</a></li> <li><a href="#a">부동산</a></li> <li><a href="#a">지적재산권</a></li> <li><a href="#a">세무</a></li> <li><a href="#a">국제·외국인</a></li> <li><a href="#a">의료</a></li> <li><a href="#a">기업법무</a></li> <li><a href="#a">행정사건</a></li> <li><a href="#a">재판·분쟁</a></li> <li><a href="#a">민사·기타</a></li> </ul> </div> </body> </html> |
CSS
|
body{ padding: 50px; } .detail_category{ width: 339px; height: 151px; padding: 20px; border: 1px solid #efefef; box-sizing: border-box; } .detail_category h2{ padding: 0 0 12px; font-size: 17px; color: #666; } .detail_category ul:after{ content: ""; display: block; clear: both; } .detail_category li { float: left; padding-right: 13px; line-height: 24px; position: relative; } .detail_category li:after{ content: ""; display: block; width: 1px; height: 13px; background: #cacaca; position: absolute; right: 7px; top: 7px; } .detail_category li:last-child::after{ content: none; } .detail_category li a{ font-size: 13px; color: #666; } |
* caption을 사라지게 할때 바로 position을 주면 col의 높이가 적용이 안될 수가 있어서 caption>span에 position을 적용하면 좋음
* 가상선택자 after는 가상의 인라인 요소를 넣는 것이기 때문에 선을 만들 때는 display: block; 을 꼭 넣어야 가로세로를 줄 수 있음
결과
 |
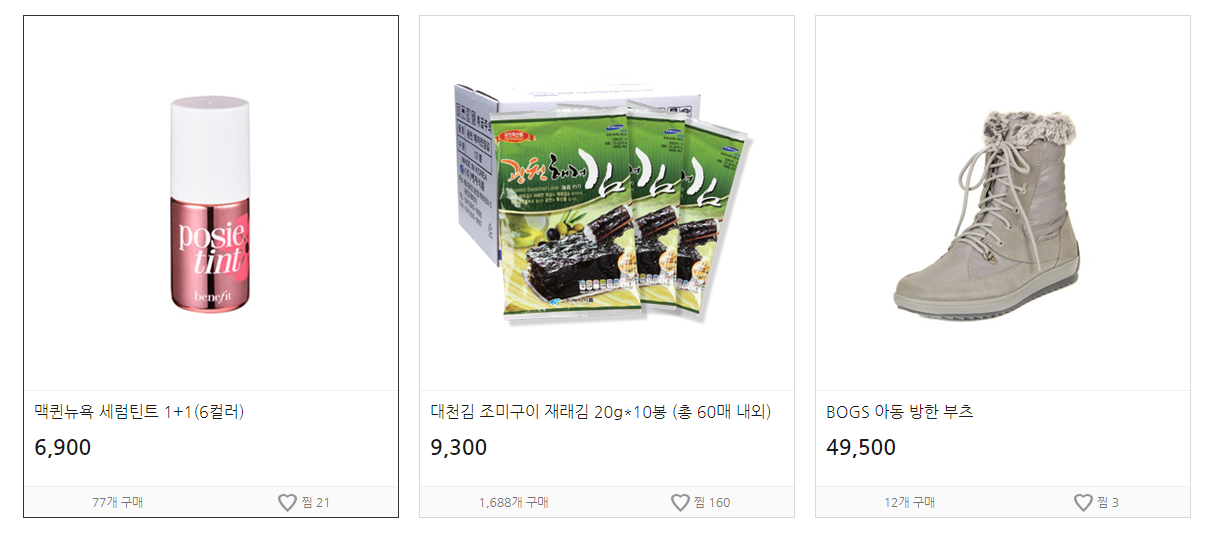
3. 기초 쇼핑몰 상품리스트
HTML
|
<!DOCTYPE html> <html lang="en">
<head> <meta charset="UTF-8"> <link rel="stylesheet" href="product list.css"> <link rel="stylesheet" href="default.css"> <meta name="viewport" content="width=device-width, initial-scale=1.0"> <title>Document</title> </head>
<body> <ul class="product_list"> <li> <dl> <dt><a href="#a">맥퀸뉴욕 세럼틴트 1+1(6컬러)</a></dt> <dd class="img"><a href="#a"><img src="img_thoumb1.jpg" alt=""></a></dd> <dd class="price">6,900</dd> <dd class="btm"> <div> 77개 구매 </div> <div> <a href="#a"><img src="ico_heart.jpg" alt="">찜 21</a> </div> </dd> </dl> </li> <li> <dl> <dt><a href="#a">대천김 조미구이 재래김 20g*10봉 (총 60매 내외)</a></dt> <dd class="img"><a href="#a"><img src="img_thoumb2.jpg" alt=""></a></dd> <dd class="price">9,300</dd> <dd class="btm"> <div> 1,688개 구매 </div> <div> <a href="#a"><img src="ico_heart.jpg" alt="">찜 160</a> </div> </dd> </dl> </li> <li> <dl> <dt><a href="#a">BOGS 아동 방한 부츠</a></dt> <dd class="img"><a href="#a"><img src="img_thoumb3.jpg" alt=""></a></dd> <dd class="price">49,500</dd> <dd class="btm"> <div> 12개 구매 </div> <div> <a href="#a"><img src="ico_heart.jpg" alt="">찜 3</a> </div> </dd> </dl> </li> </ul> </body>
</html> |
CSS
|
body{ padding: 50px; } .product_list li { position: relative; float: left; margin: 0 20px 20px 0; width: 374px; height: 501px; border: 1px solid #d9d9d9; } .product_list li:hover{ border-color: #333; } .product_list li dl { padding: 374px 0 0; }
.product_list li dt { border-top: 1px solid #f0f0f0; padding: 11px 10px 14px; }
.product_list li dt a { font-size: 16px; color: #1a1a1a; }
.product_list li dd.price { padding: 0 0 0 10px; font-size: 21px; font-weight: bold; color: #1a1a1a; }
.product_list li dd.img { position: absolute; left: 0; top: 0; } .product_list li dd.btm{ width: 100%; position: absolute; left: 0; bottom: 0; background: #fafafa; border-top: 1px solid #f0f0f0; } .product_list li dd.btm div{ float: left; width: 50%; height: 30px; line-height: 30px; text-align: center; font-size: 12px; color: #767676; } .product_list li dd.btm div a{ font-size: 12px; color: #767676; } .product_list li dd.btm div a img{ padding: 0 4px 0 0; } |
* 상품이미지 크기는 이미지 영역의 크기에 맞춰서 크롭하는 것이 좋음
* 이미지 사진은 position: absolute; left: 0; top: 0;으로 띄우고 text부분은 dl에 padding을 설정하여 내릴 수 있음
* 구매 수와 찜 수 부분은 div 가장 아래에 오기위해여 position: absolute; left: 0; bottom: 0; 으로 아래에 고정함
* div 좌측정렬 위해서 float: left;를 사용하고 각 요소의 가로는 50%로 반씩 나눌 수 있음
결과
 |